How to Set Up a Grow Tent (Beginner Walkthrough)
A tent set up properly is one you maintain rather than fight. Most environment problems trace straight back to layout decisions made on day one — the light hung too low, the filter mounted wrong, the timer left where the damp lives. Here’s the order it all goes in.
The short version:
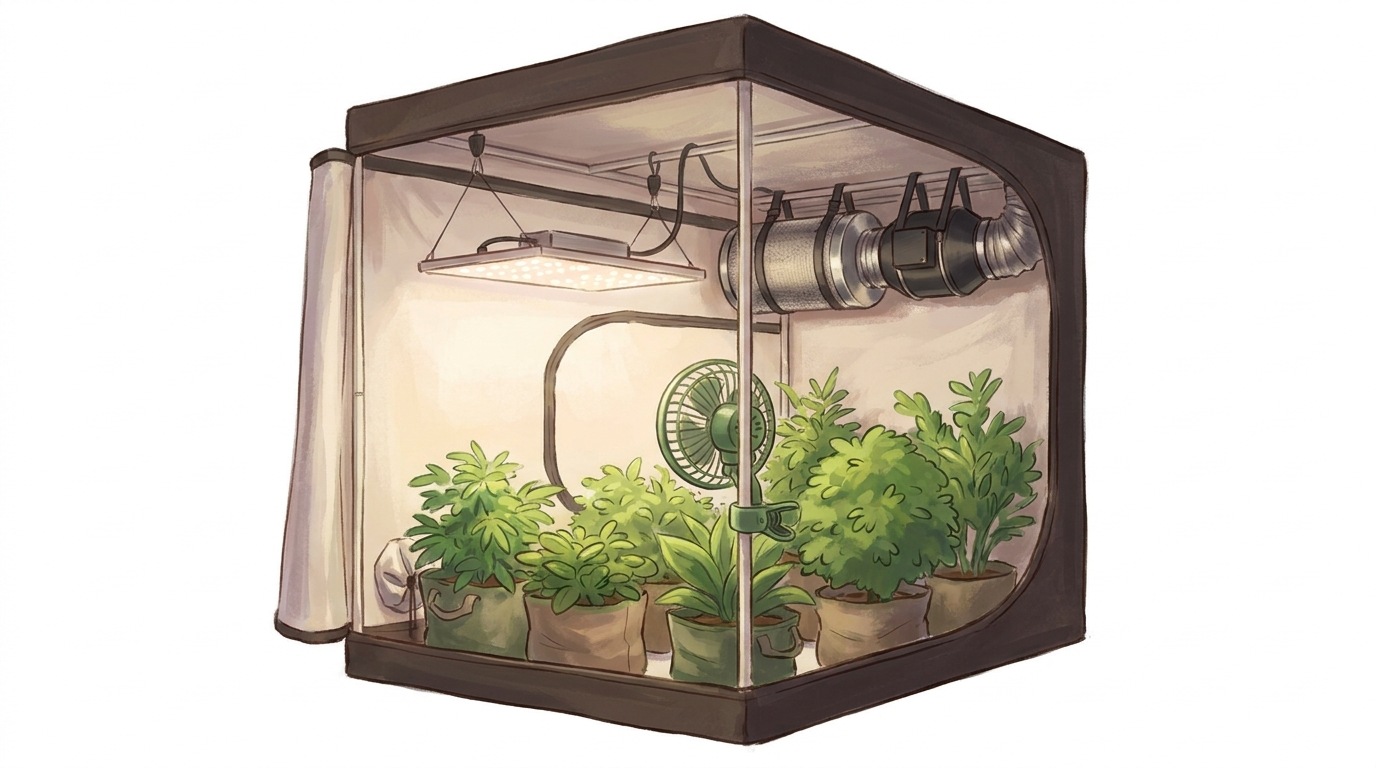
- Air comes in low through passive vents, warms, rises, and exits the top through the extraction fan
- Hang the light from the top crossbars on ratchet hangers — start it high
- Carbon filter + inline fan at the top; ducting out in the shortest run
- Leave the bottom intake vents open for negative pressure to work
- Clip fans across the canopy; timer and power strip outside the tent, drip loops on cables
Want the full breakdown? Keep scrolling.
How does the airflow system work?
The tent breathes. The inline fan pulls air out through the carbon filter at the top, which creates negative pressure — the walls suck gently inward — so fresh air is drawn in through the passive mesh vents at the bottom and all the air (and smell) flows toward the filter rather than leaking out the seams. That’s the whole principle, and almost everything else serves it. The Sauna grower tapes the intake vents shut for light-proofing, the fan has nothing to pull, the tent balloons, humidity hits 80% and the filter stops scrubbing. The tent has to breathe in to breathe out — leave the bottom vents open; the mesh stops light, the airflow does the rest.
Where does everything go?
The light: centre of the tent, hung from the top crossbars on ratchet hangers (DIG stock them) so you can raise it one-handed. Start it higher than you think — the plant can double in flower and come for it, and you can always lower a light, never move it further once the filter’s eating your headroom. Extraction: carbon filter mounted at the top (warm, smelly air rises — a filter mounted low scrubs the cleanest air and lets the rest leak), inline fan connected, ducting out a top port in the shortest, straightest run you can manage. Circulation: small clip fans pointed across the canopy, not down at it — leaves should rustle, not flap; one below and one above the canopy beats one big blast. Power: timer and power strip live outside the tent (humidity kills timers), and every cable gets a drip loop — a U-dip below the exit port so water runs off instead of tracking into the electrics.
What do I sort before the plant goes in?
Headroom and water. Hang the light high and confirm you’ve got room for the stretch — measure tent height minus pot, light distance and clearance. Protect the floor: the tent tray is splash-resistant at best, so put a builder’s tray or pond liner underneath and a saucer under every pot, because watering to runoff has to go somewhere that isn’t the carpet. Plan access so you can reach every pot from the opening without climbing in on a wet fabric floor. Get the layout, airflow and water management sorted before anything’s growing and the rest of the grow is maintenance, not firefighting.
FAQ
What’s the most important part of a grow tent setup? The airflow system — passive intake low, extraction with a carbon filter high — creating negative pressure. It controls temperature, humidity and smell all at once.
Why does my tent balloon outward instead of sucking in? Your intake can’t keep up with the extraction, often because the bottom vents are blocked or taped shut. Open the intake so the fan has air to replace what it pulls.
Should the timer go inside the tent? No. Tent humidity corrodes and shorts timers, which can leave your lights on or off at the worst moment. Keep the timer and power strip outside, with drip loops on the cables.